Saturday, April 23, 2011

DIY Up-cycled scarfs!


Yes I know.. were desperately wanting summer, so why am I making scarfs?? These are not your typical yarn, wool, heavy duty winter scarfs.. these are made out of t-shirts! Yes.. t-shirts! I of course saw it online, and HAD to do it right then. 3 shirts later.. here we are! I just found some old shirts that I didn't wear anymore.. and went at it! Although, my shirts were small, which made a smaller scarf.. I think they are still cute! Definitely  going to hit up the local thrift store and get a variety of larger shirts to make a fuller scarf!  Here is a great tutorial for this.. also this lovely one, which made me chose green!  
I made mine a little different.. but that's what makes them original! 


The process.. Because my shirt had a seam.. when stretched, some would rip. So i decided to tie knots where the seams were!
Wear doubled, or long.. 


I made two others.. the black and pink was a different cotton, so it didn't stretch as well.. so it was short. 100% cotton, jersey cotton.. works best and stretches.

Purple and white.. I wrapped both ends for a different look.

P.s don't mind my horrible double chin, and the horrible lighting due to late night and cell phone. They are really cute.. These will probably go up on swapmamas! haha I cant wait to make more neutral colors, like a black or grey. I will update when I make the bigger ones!! 

Enjoy. :)

Friday, April 22, 2011

LOVE these.


#27 my favorite. haha 

Wednesday, April 20, 2011

Harper's 1yr photo shoot!

I wish I could blog all of them... but it will take forever here.. so if you are lucky enough to see them on facebook then you can see them all.. otherwise here are some of my favorites!


We went with a blue theme this time ;)

But i couldt resist some bright colors!! 
sooo..


I just love how much of her personality came out in these pictures! These are by far m favorite. If you haven't heard of fotofly, you need to check them out!! Great studio,great photographers, and seriously great price ive found so far for pictures!! Especially an original looking picture, no cheesy backdrop with bad lighting.. seriously IN LOVE.

Enjoy. :) 

Tuesday, April 19, 2011

Dooo it. Now.

Join the website pinterest. It is awesome!  Go join and see for yourself.. better explained there, than here. Best images ever.. quotes, funny saying, gorgeous photographs, design ideas, etc. Save all the ones you love,  and categorize them! What else is awesome is that you can save the "pin it" link onto your bookmarks, and click it from a website you are on to pin a picture you come across that you like, it will then save it there! love it.  Here are some things I found that I just love! (first one being the new blog title picture. It just moved me. ha)
I think I could fill this whole book up. haha 

We need this for our living room.. just to remind ourselves. :)

I always have too! haha


hahaha. I find this slightly true. 


Totally want to do one for Harpers room! Learn how to do it here.


Thats all for tonight folks! :)

Monday, April 18, 2011

10 minute nails!

Tada! 

You would never guess right??

My family from Montana came down last week and did these, and they looked professionally done!! So of course I had to try them out! I love having my nails done, but cannot always afford the $40-50 to get them done. These babys cost me 6 bucks at wallmart!! 


While getting these I noticed other DIY nail kits, some with acrylic, some with gel like polish.. still under 20 bucks! I might try those next. I am still interested in doing nails/going to school.. so practice would never hurt!! :) 

These are really fun and easy to use. I did them standing at the kitchen counter! I was skeptical at how well they would stay on, but I watched them have to be soaked off in acetone, and have read where that is the best option.. the glue is actual nail glue! My fingers were sticking together. Its been a few days and they still look good. My mom even asked where I had gotten them done. Definitely worth a few bucks and a few minutes. perfect for last minute, going to a party/event/wedding/date etc. or in my case just because!!
A few ideas...
-I tried painting the tips with clear nail polish and dipping in glitter.. looked really cute.
-Painting them first and drying, then gluing.. if your like me, i can never paint my real nails and sit still long enough to have them dry completely and look flawless.. I ALWAYS smudge them.

Enjoy. :)

Wednesday, April 13, 2011

Sharing time!

Soo  I just wanted to share a few DIY tricks I had up my sleeve, I know, I know.. I'm soo clever. haha This Weekend my little girl turned one, and for some of the "Sweets" to eat I made cake pops! If you have ever had cake bites, or checked out Bakerella (which is where I got the idea)  you know what I'm talking about! They are soo easy, and fun too! I made two different kinds, the first not being as good as the second, so here is what you will need for my favorite.

Red Velvet Cake pops(bites)
1 box of cake mix
1 can of Cream cheese frosting
Chocolate, I used make n' mold candy wafers, found at Roberts crafts.
Lollipop sticks(if wanting to do the pops)
Styrofoam or flower arrangement foam.. (to place cake pops while hardening.)  

Bake the cake as directed, cool, then crumble until fine, no big chunks.

Mix in desired amount of cream cheese frosting. I used a little less than half the can, because on my first run I used the whole can, which was called for, and the mixture was VERY moist and gooey like. I wanted mine a little richer tasting, and more cake like.

When you have the desired consistency roll into bite size balls.. not too small, not too big.  I rolled mine and placed on a cookie sheet and placed in the fridge over night. They will work if you refrigerate for a couple of hours, you just want them firm enough to be dipped into the melted chocolate.  

Its up to you if you would like to make "pops" rather than "bites" But, I find the pops easier, because you have the stick to hold onto.  I melted the chocolate in the microwave, 30 seconds at a time. I then dipped the ends of the sticks in the melted chocolate and stuck the ends into to cake balls, to harden, and make the cake ball stay put while dipping!

Now comes the fun.. dip, swirl, cover in chocolate! I of course used bright colors! Be careful tho, too much chocolate can weigh down the cake and they will fall off the stick! Also, you might want to do a few at a time, the rolled up cake balls tend to get warm and soft and harder to dip without falling apart.

Finally, place onto styrofoam. I didnt do this, and had to hold mine up right until they hardened enough and could set them down.. the foam will hold them up and in place for you! Then EAT EM'! yummmy!


Next up... GLITTER TOES! How fun would it be to do these together?!
 Things you will need:

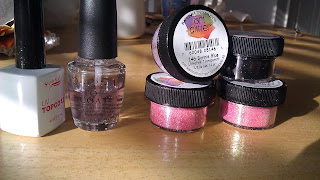
Glitter (art glitter brand from Roberts)
Clear top coat/base coat. (I used O.P. I)
Paper
Old paint brush, of makeup brush.


These are pretty simple.. I layered 2 different colored glitters. But one will work just fine. I Tried the gel uv top coat first, I thought it would hold and seal the glitter better, but the brush was stiffer and seemed to rub some of the glitter off, but i did use both.

Work with one toe at a time, it gets messy!
Paint your toe(s) as usual, with a layer of top coat. Then pour the glitter of the painted toe.. make sure you have a piece of paper, or something to catch the extra glitter on so you can reuse it. you will need to tap your foot to get some of the excess glitter off, and then you can use the brush to wipe away from around your toes.
Do the other foot.
By this time you can go back to the first and paint a top coat and cover again.  then after both feet have been covered twice you can go back and finish with a clear coat, I did two just to be safe.
You will have glitter left over on your toes, but once they are completely dry it will rub off and can be washed off in the shower!! I love them, they are so cute! And the glitter I bought was $4.99 with 40% off! Plus I already had the top coat!


 Soo cute!

Happy DIY'ing. :)

Look Whoo turned 1!

Harper's Party theme, you can find this and other great DIY party packages at Dimple Prints. 

I cannot believe it has been a year! Where does the time go? I think about where  I was at in life when I got pregnant, and where WE are now.. and it amazes me.  I hate to brag, but I think Ive adjusted to motherhood quite well! haha but seriously.. I wouldn't change anything. Being a Mom is not easy, and just when it seems to get easier, something changes and you have new mommy issues to deal with. Harper, although a pretty easy baby.. still gives me a run for my money. She is quite the early bird, and has all the energy in the world.. even at 4 am! I wish I could jump up and want to run around the house like that. She is soo smart, and learning things quickly, she has the cutest personality, and shows her drama queen side often... she is definitely her Mother's child! But Dad doesn't get off that easy, she is stinky, grumpy when she first wakes up, and needs her bottle.. just like dad needs his energy drink! ha Its so weird to look at her and see a mixture of both of us in her.. sometimes she looks just like her dad, other times I see me. I still get weird-ed out and have to take a minute and process it all... like the fact that this little tiny person walking around is OUR creation, I gave BIRTH to her! Crazy.
I was sooo excited to plan, and have a 1st birthday party for her, so excited that Michael thought I was going crazy. I had a lot on my plate, especially due to the fact that I leave everything to the last minute, and forgot that there were other life responsibility's to take care of before I went and splurged on unnecessary(necessary to me) party things... who would have known?  But in the end it turned out just the way I envisioned it, even when we opted to have it in our tiny apartment instead of the park. We were lucky enough to have Michael's mom and sister drive down from Montana and stay with us for that weekend, it was great to have them here and great to have them help out with party details! Soo thankful for that!  I DID complete my candy buffet like planned, and was very pleased with it, I also made cupcakes, cake pops.. I will blog a "how to"  cuz they are delicious! I also went ahead and made Harper's cake.. a giant cupcake to smash.. well end up on the floor.. but it turned out cute! I made artichoke dip too! ahh Im soo domestic! haha  Thankfully my awesome mom and Michael's step mom made some of there famous salads as well so everyone could be fed!
I was so excited to see everyone show up, and I mean EVERYONE! I am soo thankful for all the family and friends that came out and made Harper's Birthday special, she is definitely loved! I will have to update with more Pictures.. here are a few the sis-in-law took. (nope.. still not married, deal with it. ) haha.


 I ordered a custom outfit.. that never arrived!! grr. So I made her a shirt, and put together something we had.. 
still turned out cute.

 She decided cake just wasnt her thing, and pushed it over.

Birthday girl!

Harper was so good! She was soo tired, and fell asleep right as people started showing up, but she managed to stay awake for her party. Our front room looked like Christmas morning, we had to open everything and try it all out.. duh!  
 We have lots of reading to do! 

 Ahhh! Birthday cyclone hit! haha

I hated cleaning up, not that it was a disaster.. but the fact that it doesn't look like a little girls Birthday anymore. :(   Ohh well.. there is always next year!! yay!

Wednesday, April 6, 2011

We are dorks.


The things we do when we have been up all morning! :) Love her.

The countdown!

I will have a 1 yr. old in 4 days!!!! ahhhh. I cannot believe that its already been a year.. I seriously still feel like i just had her. haha Plus, Im supposed to be all skinny and back to normal by now right? ugh. Anyways.. birthday post to come, Im going crazy and STRESSING. I know..shes only turning one, but its a big deal to me.. Im in over my head, but i hope one day she can look back and appreciate it. :)
Harper really is growing up soo fast, and she is soo smart! I know every mom says that, but it amazes me how much they really do pick up. Harper knows what a doggy and kitty is, she points and trys to say both words! My mom has 2 cats and 2 dogs, and she loves them! She trys to say ball, and knows what it is, she even went and got her ball for me one day.. no joke! She picks up our cell phones and holds them to her ear(as best as she can) When we say hello.. its so funny. She knows what a comb is used for, and a makeup brush.. she sits in the sink when i get ready :) She will try and brush her hair, and I taught her "pretty girl" I say pretty girl, and she smiles and puts both hands on her head.. video post soon, and video post of her dancing! Ahhh we love to dance. She really is my mini me.. ohh no. haha
I love watching her grow, and learn.. theres just so many things she is doing.. walking being one of them!! Although, shes not getting up and just walking everywhere.. she is taking more and more steps, and standing alone, shes even managed to walk while drinking a bottle, little multi-tasker.
Also, Michaels Mom and sister are coming down from Montana! We have not seen them since Christmas.. im excited!!  Now if Mother nature could be nice til after Sunday.. fingers crossed.

Tuesday, April 5, 2011

Cloth wipes trial.

How cute is this owl wipe case?! It matches the theme of Harpers bday. I "swapped" for this on swapmamas, with one of my fellow swappers.. but check out this mamas website! she does an amazing job on making these little gems. If you remember my last post, you saw all the cute cloth wipes i received, and now have a case for them! Ive been using them as wash clothes.. but now decided to make my homemade wipe solution... Im turning into the weirdest person ever!!! Momness overload. haha


You can find these essential oils here

Ingredients you will need: 
Olive oil
baby wash(can be original) lavender adds more scent. 
EO's (essential oils) For this recipe you need lavender and tea tree. 
Bottle with spout or spray bottle. 

I used this one pictured, but it leaked, so I washed out an old hair spray bottle to use. There are more instructions and recipes at the zany zebra. Now i know im kind of backwards, I dont use cloth diapers, so clothe wipes with disposable diapers are a weird combo.. i know. Who am I?! haha I think they are nice to use at home.. I used the solution and cloth wipe last night, and her rash was cleared up this morning! Michael thinks it is the grossest thing ever and refuses to use them.. I honestly dont think i can make the switch all together, I like the idea, they are cute, and the wipe solution smells soo good and makes baby's bum so soft! Plus ill probably use the cloth wipes and solution for "clean-up" Im always on the go, and she gets messy!  

Never thought in a million years id be trying home-made mommy stuff.